How to Set Adjustable Shoring Props for Concrete Slabs
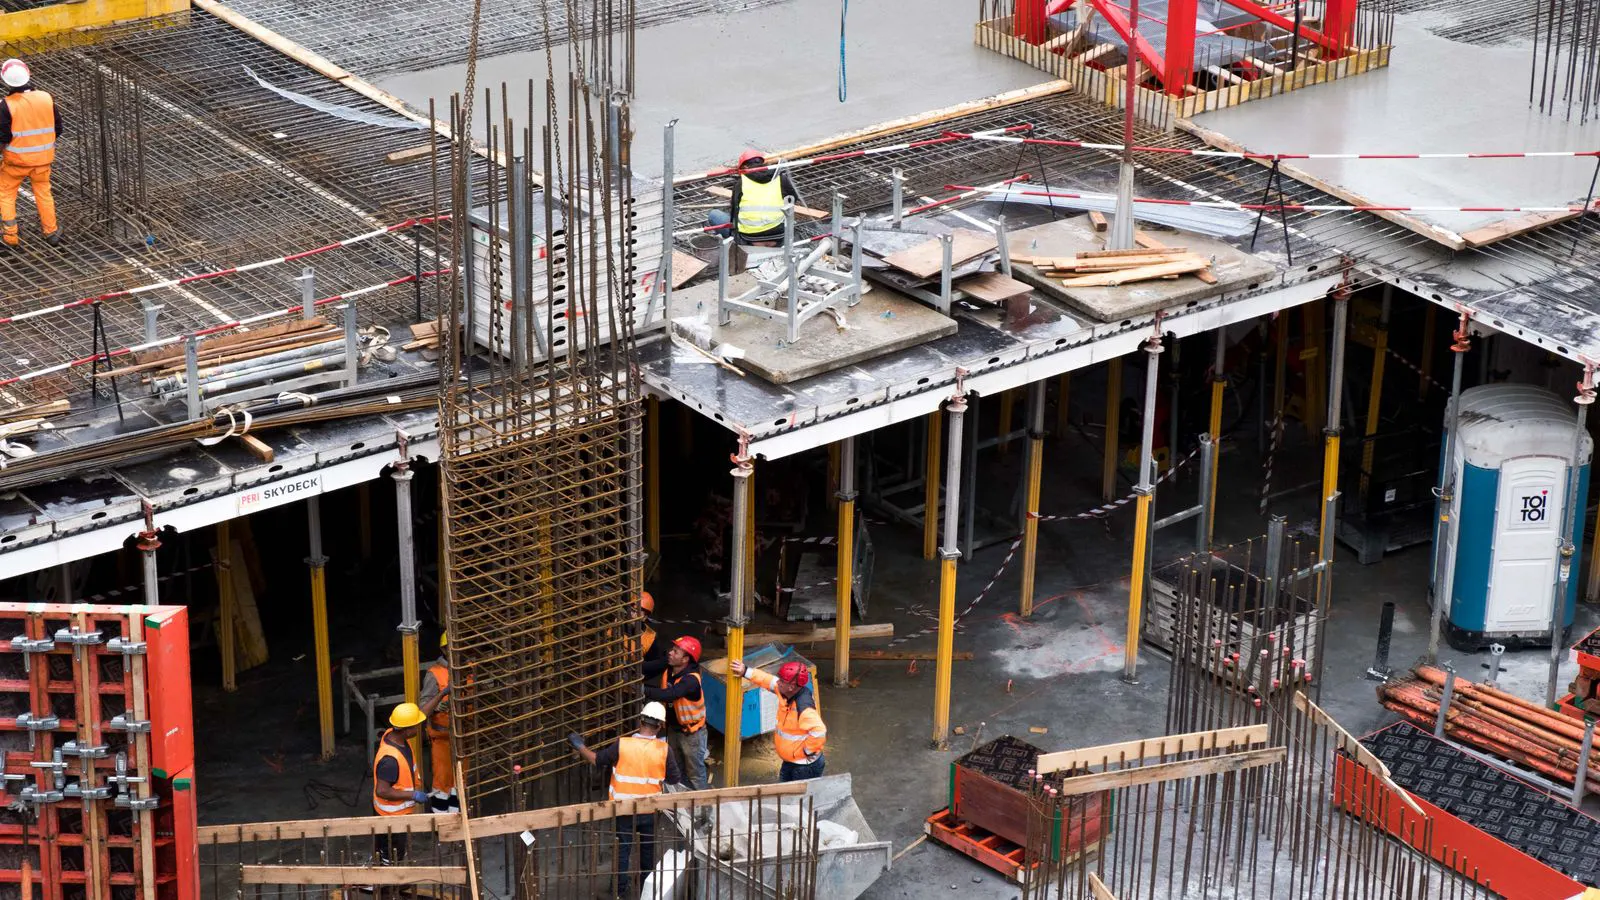
Setting adjustable shoring props involves preparing the base, establishing alignment, and applying load gradually. Correct installation prevents slab deflection and prop failure. This guide covers prerequisites, step-by-step installation, and final verification to ensure safe slab shoring setup.
- Verify base plates and mud sills on uneven ground to prevent prop tipping
- Use jack screws to set prop height without over-torquing the collar nut
- Check vertical alignment before releasing any formwork ties
- Apply a trial load before striking formwork to test the shoring system
- Confirm all props are fully extended and locked before concrete placement
Prepare the Site and Materials
Before positioning any adjustable shoring props, confirm the floor or ground below is firm enough to carry the dead load of the formwork and live load of the concrete. Soft or uneven ground requires a mud sill. A mud sill is a thick timber beam or steel plate that spreads the point load from the prop over a larger area. Without this, the prop base can punch through the slab or tilt.
Gather all props, base plates, head plates, and connecting hardware. Inspect each prop for bent tubes, damaged collars, or rust that weakens the threads. A prop with a bent head plate will not seat correctly on the formwork. This creates a weak point that can fail under load.
Check your formwork design. The shoring layout must match the structural engineer requirements. If the design specifies a maximum span or prop spacing, measure the area accordingly. Deviating from the design changes the load path and can cause deflection.
Set the Base Plates Correctly
Place the base plate under each prop position. The plate should sit flat on the mud sill or the prepared floor. If the surface is sloped, use shims or wedges. Never stack multiple small pieces of wood to make up height. Use solid, flat shims that distribute the load evenly.
The reason for this step is stability. A prop that is not perfectly level at the base will not hold its height. As you extend the prop, the unlevel base creates a moment that pushes the prop out of plumb. Over time, this load shifts to the threads and collars.
Check each base plate with a level. The plate should be within a few millimeters of level. If the ground is very uneven, consider adding a longer sill or repositioning the prop. Do not force the prop to stand on a tilted plate.
Position the Props in Line
Lay out the prop positions across the slab area. Use string lines or chalk lines to mark the grid. The spacing depends on the slab thickness, span, and concrete mix. A typical setup places props in a square or rectangular grid under the formwork.
Keep the props aligned with the formwork edges and internal supports. If a prop is off-grid by even a small amount, the load transfers to the formwork panels instead of the structural support. This can cause the formwork to bow or lift.
The reason for alignment is load transfer. The prop must push directly up into the formwork. If it is offset, it creates a lateral force. This force can loosen the prop head or damage the formwork connection.
Extend the Props to the Required Height
Place the prop under the formwork beam or waffle grid. Extend the prop until the head plate touches the formwork. Do not tighten the collar nut yet. You want to feel the contact point to ensure the prop is not overextended.
The reason for gradual extension is control. If you tighten the collar too early, the prop may bind. If you extend it too far, the head plate may slip off the formwork. Adjust the prop in small increments until the head plate sits flush against the formwork.
Use a spirit level or a laser level to check the prop verticality. The prop should be plumb. If it is leaning, correct the base plate or reposition the prop. A leaning prop transfers horizontal force to the formwork. This weakens the connection and risks collapse.
Tighten the Collar and Lock the Prop
Once the prop is at the correct height and vertical, tighten the collar nut. Turn the nut by hand first, then use a wrench to snug it. Do not over-tighten. Excessive force can strip the threads or crack the head plate.
The reason for moderate tightening is to lock the prop without damaging the threads. The collar nut holds the prop at the set height. It does not need to be torqued to a high value. A snug fit prevents the prop from shortening under load.
Check the prop after tightening. Gently push on the top of the prop. It should not move or shorten. If it does, the threads may be dirty or damaged. Clean the threads or replace the prop. A loose prop will sink as the concrete weight increases.
Apply a Trial Load
Before striking the formwork, apply a trial load to the shoring system. Place sandbags or a small amount of concrete on the formwork. This tests the entire setup.
The reason for the trial load is verification. The trial load reveals any weak points in the prop, base, or formwork connection. If the formwork deflects more than expected, the shoring is insufficient. You can adjust the prop heights or add more props before the full concrete placement.
Monitor the deflection during the trial load. Use a level or a laser to measure the movement. If the formwork drops, stop and re-evaluate the shoring layout. Do not proceed with full concrete placement until the deflection is within acceptable limits.
Verify the System Before Concrete Placement
Walk the entire slab area and check every prop. Ensure all base plates are level, all props are vertical, and all collars are tight. Check the formwork connections. All ties and clips should be secure.
The reason for this final check is safety. The shoring system must support the full weight of the wet concrete. Any weak point can fail during placement. The final verification step catches errors that may have been missed during installation.
Confirm with the site supervisor and the structural engineer. Sign off on the shoring installation. Only then should the concrete pour begin.
Common Mistakes to Avoid
| Mistake | Consequence | Correction |
|---|---|---|
| Uneven base plate | Prop tilts and shortens under load | Use solid shims or a level mud sill |
| Over-tightening collar | Stripped threads or cracked head plate | Snug the nut by hand and light wrench pass |
| Misaligned prop grid | Lateral force on formwork | Use string lines to mark prop positions |
| Skipping trial load | Undetected deflection during pour | Apply sandbags or partial concrete load |
| Using damaged props | Sudden collapse under load | Inspect all props for bends and rust |
These mistakes are common because the setup seems simple. The props look straight. The base plates look flat. But small errors compound under load. A prop that is off by a few millimeters can cause a formwork panel to lift. A collar nut that is loose can shorten by a centimeter under pressure. That centimeter can cause the formwork to crack or leak.
Final Verification and Sign-Off
The final step is a physical inspection of the entire shoring system. Do not rely on the checks you performed during installation. Walk the slab with a level and a flashlight. Look for any props that have shifted or shortened. Check the base plates for movement.
The reason for a separate final inspection is that the setup changes after the formwork is fully loaded. The formwork weight, the formwork ties, and the concrete placement all add stress. A prop that was secure during installation may have loosened during the trial load.
Sign the shoring inspection record. This document protects the site and the team. It confirms that the shoring system meets the design requirements. If the inspection fails, do not pour. Correct the issue and re-inspect. A delayed pour is a small cost. A formwork collapse is a disaster.
Adjustable shoring props are a critical part of slab construction. They support the formwork until the concrete gains strength. The setup is not just about placing props under a beam. It is about understanding the load path and ensuring every component is secure. Follow the steps above. Check your work. And always verify the system before the concrete arrives.
Frequently asked questions
Can I use adjustable shoring props on soft ground without a mud sill?
No. Soft ground requires a mud sill to spread the load. Without it, the prop base can punch through or tilt, causing the prop to fail.
How do I know if the prop is extended too far?
If the head plate does not sit flush against the formwork, or if the collar nut is fully tightened without contact, the prop is overextended. Adjust the base plate or reposition the prop.
What is the purpose of the trial load?
The trial load tests the shoring system under partial load. It reveals any weak points or deflection before the full concrete weight is applied.
How often should I check the props during the pour?
Check the props and formwork after the concrete reaches a certain level. Look for any shortening or movement. Stop the pour if any prop shows signs of failure.
Can I use damaged props in a pinch?
No. Never use damaged props. A bent tube or damaged collar can fail without warning. Replace any prop that shows signs of damage before installation.